Why Home Composting for Beginners Matters
Composting turns kitchen scraps and yard waste into rich soil that helps plants thrive. For beginners, it reduces trash, saves money, and improves garden health without complicated tools.
This guide gives clear steps, simple options, and troubleshooting tips so you can start composting at home with confidence.
Choose a Simple Method for Home Composting for Beginners

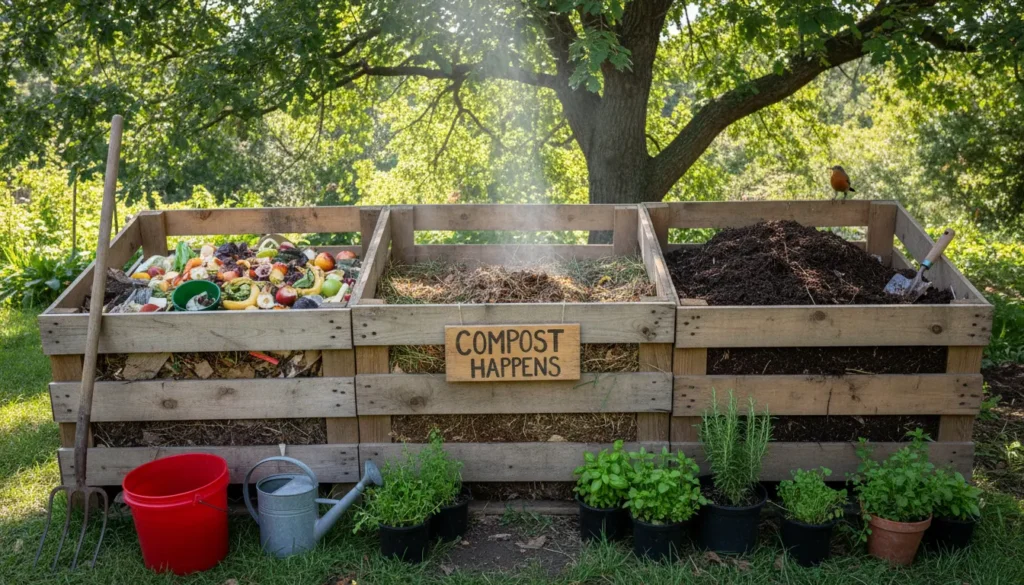
Pick a method that fits your space and time. There are three user-friendly options: bin composting, tumbler composting, and vermicomposting.
- Bin composting — a stationary bin in the yard. Low cost and low maintenance.
- Tumbler composting — a sealed drum you rotate. Faster compost but higher cost.
- Vermicomposting — uses worms in a tray or bin. Best for indoor or small-space setups.
How to Choose the Right Method
Consider these points when choosing: available space, how much organic waste you produce, budget, and how fast you want compost.
If you live in an apartment, vermicomposting or a small indoor bin works well. For yards, a simple outdoor bin is usually best.
Materials: What to Add and What to Avoid

Compost needs a mix of carbon-rich materials (browns) and nitrogen-rich materials (greens). Aim for a roughly 3:1 ratio of browns to greens by volume.
- Greens: vegetable scraps, fruit peels, fresh grass clippings, coffee grounds.
- Browns: dry leaves, shredded paper, cardboard, straw.
- Avoid: meat, dairy, oily foods, diseased plants, and pet waste from carnivores.
Practical Examples of Layers
Start with a layer of coarse browns to allow airflow, then add greens, and cover with more browns. Repeat this layering as you add material.
Example: 5 buckets of dry leaves (browns) mixed with 2 buckets of kitchen scraps (greens).
Step-by-Step Setup for Home Composting for Beginners

Follow these steps to build a functioning compost system that produces usable compost within months.
- Pick a location: level ground with partial sun and good drainage.
- Set up your container: place a bin or tumbler on the soil, or prepare a worm bin indoors.
- Start your pile: add a base layer of browns, then alternate greens and browns.
- Maintain moisture: aim for a damp sponge feel, not soggy.
- Turn or aerate: every 1–2 weeks for bin/tumbler; gently stir vermicompost occasionally.
Turning Frequency and Temperature
Turning speeds up decomposition by adding oxygen. A hot compost (130–150°F) breaks down material faster, but you can still compost successfully at ambient temperatures.
If you prefer low-effort, expect a slower timeline but similar results over time.
Composting one ton of food scraps can prevent about 0.5 to 1 metric ton of CO2-equivalent emissions by avoiding landfill methane.
Common Problems and Fixes
Beginners often run into a few common issues. Most have simple solutions that restore a healthy composting process.
- Bad smell — add more browns and increase aeration. Smells mean too much moisture or lack of air.
- Pests — avoid adding meat or oily foods and cover food scraps with browns. Use a sealed tumbler or worm bin for indoor safety.
- Slow breakdown — chop materials smaller, maintain moisture, and turn more often.
When Is Compost Ready?
Finished compost looks dark, crumbly, and smells earthy. There should be no recognizable food or yard waste pieces. Depending on method and maintenance, this can take 2 months to a year.
How to Use Finished Compost
Apply finished compost to garden beds, mix it into potting soil, or use it as mulch around plants. It improves soil structure, water retention, and nutrient content.
- Top-dress lawns or flower beds with a thin layer.
- Mix 1 part compost with 2–3 parts soil for new plantings.
- Use as a seed-starting mix when combined with other ingredients like sand or perlite.
Small Real-World Example
A two-person urban household started a 10-gallon worm bin and a 50-gallon outdoor bin. They saved about 40% of kitchen waste from the trash and produced a steady supply of compost for balcony and yard plants.
After six months of regular feeding and occasional turning, their pots showed stronger growth and they reduced store-bought fertilizer use.
Final Tips for Home Composting for Beginners
Start small and keep it simple. Regularly add a balance of greens and browns, maintain moisture, and aerate the pile.
Track progress, learn by doing, and adjust the method to fit your lifestyle. Composting is a low-cost, high-impact way to improve your garden and reduce waste.


