Home composting is an effective way to reduce kitchen waste and create nutrient-rich soil for gardens and potted plants. This guide shows simple, practical steps to start and maintain a home composting system that fits apartments and yards alike.
Getting Started with Home Composting
Choose a composting method that matches your space and daily routine. Common methods include a backyard bin, tumbler, worm bin (vermicompost), or a small countertop bokashi system.

Consider these factors when deciding: climate, available space, the amount of organic waste you produce, and how quickly you want finished compost.
Essential Materials for Home Composting
Your compost pile needs a balance of carbon-rich and nitrogen-rich materials to decompose efficiently. Carbon materials are called “browns,” and nitrogen materials are called “greens.”
- Greens: vegetable scraps, fruit peels, coffee grounds, fresh grass clippings.
- Browns: dry leaves, shredded paper, cardboard, straw.
- Optional: garden soil or finished compost to introduce microbes.
How to Build a Simple Compost Pile
Start with a layer of coarse material for airflow, then alternate browns and greens. Maintain a ratio of roughly 3 parts brown to 1 part green by volume.

Keep the pile moist like a wrung-out sponge and turn it every 1–2 weeks to aerate and speed decomposition.
Step-by-Step Setup
- Pick a location: shaded, well-drained spot if outdoors; a ventilated spot for tumblers or worm bins indoors.
- Create a base: twigs or straw to improve drainage and airflow.
- Add materials: layer brown then green, then brown.
- Monitor moisture and temperature: warm piles indicate active decomposition.
- Turn or mix: use a pitchfork or rotate a tumbler to add oxygen.
Home Composting Tips for Success
Small changes in handling can prevent smell, pests, and slow breakdown. Follow practical habits to keep your system healthy.
- Chop larger items to speed decomposition.
- Avoid meat, dairy, and oily foods in typical backyard piles to reduce pests.
- Use a kitchen caddy for scraps and empty it daily into the main system.
- Maintain the brown to green balance to avoid slimy or smelly piles.
Troubleshooting Common Problems
If your compost smells rotten, add more browns and aerate. If it’s too dry, add water and greens. Slow decomposition often means the pile is too cold, lacks nitrogen, or needs turning.

For fruit flies, cover fresh greens with brown material or store scraps in a sealed container until you add them to the pile.
Types of Home Composting Systems
Choose the system that matches your lifestyle. Each has pros and cons for speed, maintenance, and space.
- Backyard bin: low cost, larger capacity, requires space and turning.
- Tumbler: easier to turn and faster, moderate cost, limited volume.
- Vermicompost (worm bin): excellent for apartments and fast results for kitchen scraps; requires some care for worms.
- Bokashi: fermenting system for all food types including meat; requires a finishing stage in soil or compost.
Using Finished Compost
Finished compost is dark, crumbly, and smells earthy. It can be mixed into garden beds, used as a top dressing for lawns, or blended with potting mix for container plants.
Apply a 1–2 inch layer to planting beds or mix 10–30% compost into potting soil for richer growing medium.
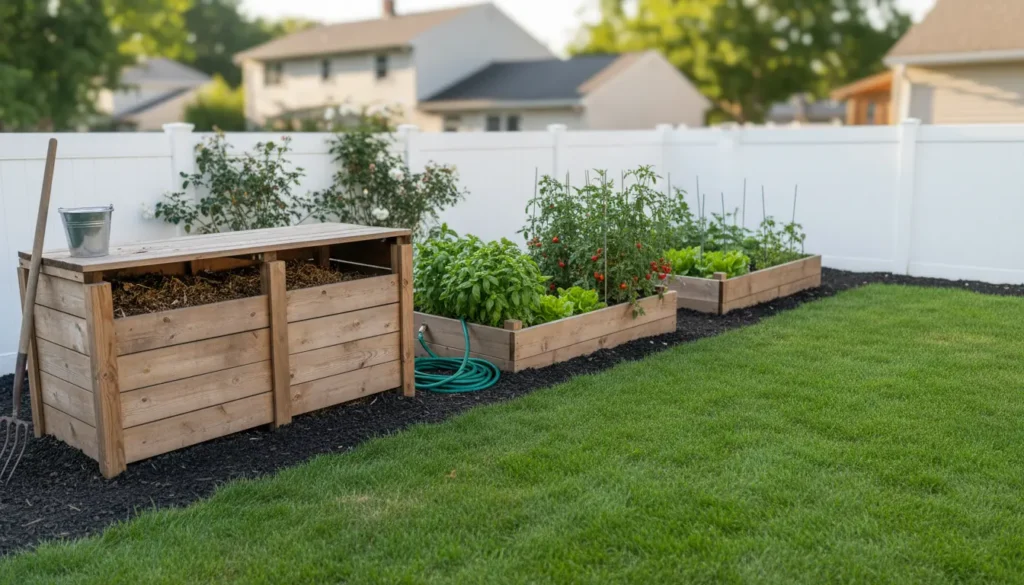
Real-World Example: Small Garden, Big Results
Case study: A three-person household in a suburban town started a 3-bin backyard compost system. They collected kitchen scraps in a countertop pail and layered them with shredded leaves from their yard.
After six months of regular turning and maintaining a 3:1 brown to green ratio, they produced about 1 cubic yard of finished compost. This compost replaced half of the purchased soil for their raised beds and improved tomato yield noticeably in the next season.
When to Consider Professional or Commercial Options
If you produce large amounts of organic waste or want faster, hands-off results, look into local community composting programs or electric composters. These options handle higher volumes and reduce manual labor.
Some municipalities offer curbside composting or drop-off centers that accept meat and dairy, expanding what you can divert from the landfill.
Quick Checklist to Start Home Composting
- Choose a composting system that fits your space.
- Collect greens and browns separately at first.
- Maintain moisture, aeration, and a 3:1 brown to green ratio.
- Troubleshoot odors with extra browns and regular turning.
- Use finished compost to improve soil health and plant growth.
Starting home composting is a practical step toward reducing waste and building healthier soil. With a simple system and a little routine, most households can produce valuable compost year-round.


